
Calatheas are more sensitive to changes in moisture, humidity, light, and temperature than many common houseplants, but their care becomes much easier once you learn what their leaves are telling you. This guide focuses on the practical details that matter most indoors: how I judge when to water, where to place the plant, what healthy new growth looks like, and how I troubleshoot curling, browning, and drooping without changing five things at once.
Calathea Indoor Care Basics
Calatheas are grown primarily for their patterned foliage. Depending on the variety, leaves can have stripes, feathered markings, silvery backgrounds, deep greens, or purple undersides.
Many plants commonly called Calatheas are now classified in the genus Goeppertia, but “Calathea” remains the familiar name used by many growers and retailers.
They’re members of the prayer plant family, Marantaceae, and one thing that surprises new owners is how much their leaves can move.
Leaves may become more upright in the evening and change position again during the day. I’ve learned not to mistake this normal movement for drooping. What concerns me more is a plant that suddenly becomes limp and stays that way.
For indoor care, the basic targets are:
- Bright, indirect light
- Consistent but not saturated soil moisture
- Loose, well-aerated soil
- A pot with drainage
- Moderate to higher humidity
- Stable indoor temperatures
- Moderate fertilizer while actively growing
The key word is consistent.
I’ve found Calatheas are much less forgiving of repeated extremes than plants such as pothos or snake plants. Letting one become severely dry, soaking it, moving it into stronger light, and then compensating with extra fertilizer creates more problems than maintaining reasonably steady conditions.
For the principles that apply across your whole collection, see the Complete Indoor Plant Care Guide (Beginner to Advanced).
Light: Bright Without Harsh Sun
Calatheas generally perform best in bright, indirect light.
The distinction between bright indirect light and a simply bright-looking room matters.
A location near a window can work well, but I pay attention to whether strong sunlight actually lands on the foliage. Several hours of intense afternoon sun through a window can be much harsher than bright ambient light.
Signs the Light Is Too Strong
Watch for:
- Bleached patches
- Fading patterns
- Dry, scorched areas
- Curling during intense sun
- Crispy damaged tissue
Gentler morning light may be tolerated, but I wouldn’t move a Calathea that’s accustomed to filtered light directly into strong afternoon sun.
If you’re changing its location, do it gradually.
What Low Light Looks Like
Calatheas can tolerate moderate indoor light, but that doesn’t make them plants for a nearly dark corner.
In insufficient light you may notice:
- Slower growth
- Smaller new leaves
- Less vivid foliage
- Fewer new leaves
- Soil taking much longer to dry
That final clue is especially useful.
One of the most important connections I’ve learned to watch with indoor plants is light and water use. When a Calathea gets less light, especially during winter, its soil often dries more slowly.
If you continue watering at the same frequency you used during brighter months, the roots can remain wet for too long.
Where to Put a Calathea
Possible locations include:
- Near an east-facing window
- Back from an intense south- or west-facing window
- Behind a sheer curtain in a bright room
- Near other tropical plants
- In a naturally humid room that still gets adequate light
A bathroom can work beautifully—but only if it has enough light.
I’ve found “Calatheas like humidity” can lead to poor placement advice. A dark bathroom doesn’t become a good plant location just because someone takes a hot shower there every morning.
For more help comparing rooms and windows, use the Where to Place Indoor Plants (Room-by-Room Guide).
Watering: Moist Doesn’t Mean Wet
Calatheas prefer more consistent moisture than drought-tolerant houseplants.
I don’t let the entire root ball become bone dry before watering, but I also don’t try to keep the soil permanently wet.
Instead, I check the upper portion of the mix. Once it has begun drying while some moisture remains deeper in the pot, I start considering whether the plant needs water.
That’s different from watering automatically every Sunday.
How I Decide When to Water
I use several clues together:
- How the upper soil feels
- How heavy the pot feels
- Whether the leaves are beginning to curl or droop
- How quickly the pot has been drying recently
- The season and current light
If the upper inch or so is drying and the pot feels noticeably lighter, watering may be appropriate.
I try not to wait until the plant is severely wilted.
Repeated cycles of letting a Calathea become extremely dry and then soaking it can contribute to stressed foliage and crispy edges.
How to Water a Calathea
When watering:
- Water the soil evenly.
- Thoroughly moisten the root zone.
- Let excess water drain from the bottom.
- Allow the pot to finish draining.
- Empty water collected in a saucer or decorative cachepot.
I prefer this to frequent little sips.
Tiny amounts of water can wet one portion of the root ball while leaving another dry. A proper watering followed by controlled drying gives me a much clearer idea of what’s happening inside the pot.
Water Quality and Brown Tips
Calatheas have a reputation for developing brown tips, and water quality can sometimes contribute.
If a plant repeatedly develops brown tips despite otherwise stable care, trying filtered, distilled, or suitable collected rainwater can be a reasonable troubleshooting step.
But I wouldn’t change the water supply after seeing one brown tip.
Brown edges can also be associated with:
- Dry air
- Inconsistent watering
- Fertilizer or mineral accumulation
- Root problems
- Excessive drying
- Environmental stress
This is one reason Calathea troubleshooting can become frustrating: the leaf tells you something is wrong, but it doesn’t always tell you exactly what.
I check the entire growing environment before changing the routine.
Humidity Matters—Especially in Winter
Humidity is one area where Calatheas can be noticeably less forgiving than many common houseplants.
Very dry indoor air can contribute to:
- Crispy edges
- Brown tips
- Curling
- Faster moisture loss
- Poor-looking new foliage
I’ve found winter deserves extra attention because indoor heating creates an awkward combination: the air can become much drier while shorter days cause the plant itself to use water more slowly.
That means dry air doesn’t necessarily mean the soil needs more water.
Those are separate conditions.
If the room is consistently dry, a humidifier is more reliable than repeatedly misting the plant. Grouping compatible tropical plants together and keeping the Calathea away from heating or air-conditioning vents can also help.
Should You Mist a Calathea?
I don’t rely on misting to manage humidity.
It briefly wets the foliage but usually doesn’t meaningfully change the humidity of an entire room for long.
Constantly wet foliage combined with poor airflow can also create its own problems.
If humidity is genuinely too low, I prefer changing the environment around the plant rather than spraying the leaves several times a day.
Soil: Moisture Retention With Air Around the Roots
Calathea soil needs to do two things that sound contradictory:
Hold useful moisture while still allowing air into the root zone.
A dense mix that remains saturated can damage roots. A very coarse mix that dries almost immediately can make maintaining consistent moisture unnecessarily difficult.
A useful mix may include:
- Quality indoor potting mix
- Coco coir or peat-based material
- Perlite or pumice
- Fine orchid bark
I don’t think an elaborate recipe with numerous ingredients is necessary.
I’m more interested in how the mix behaves after watering.
Does it absorb water evenly? Does excess water escape? Does the mix remain loose? Is it still saturated many days later despite reasonable light?
Those observations tell me more than following a soil recipe without considering the room and container.
The Pot Is Part of the Watering System
I strongly prefer a pot with drainage for Calatheas.
Pot material also changes drying time.
Unglazed terracotta loses moisture through its sides and may dry relatively quickly. Plastic and glazed ceramic retain moisture longer.
Neither is automatically better.
If I had a Calathea that was constantly drying too quickly in terracotta, moving it into another equally sized terracotta pot wouldn’t solve much. Conversely, a plant already staying wet too long may not benefit from an even more moisture-retentive setup.
Pot, soil, light, and watering all work together.
Repotting a Calathea
I wouldn’t repot a Calathea simply because a certain number of months has passed.
Consider repotting when:
- Roots densely circle the pot
- Roots are growing heavily through drainage holes
- The plant dries unusually quickly
- The soil has compacted or degraded
- Growth has slowed despite good conditions
- You need to inspect suspected root problems
Spring or early active growth is often a convenient time.
How to Repot a Calathea
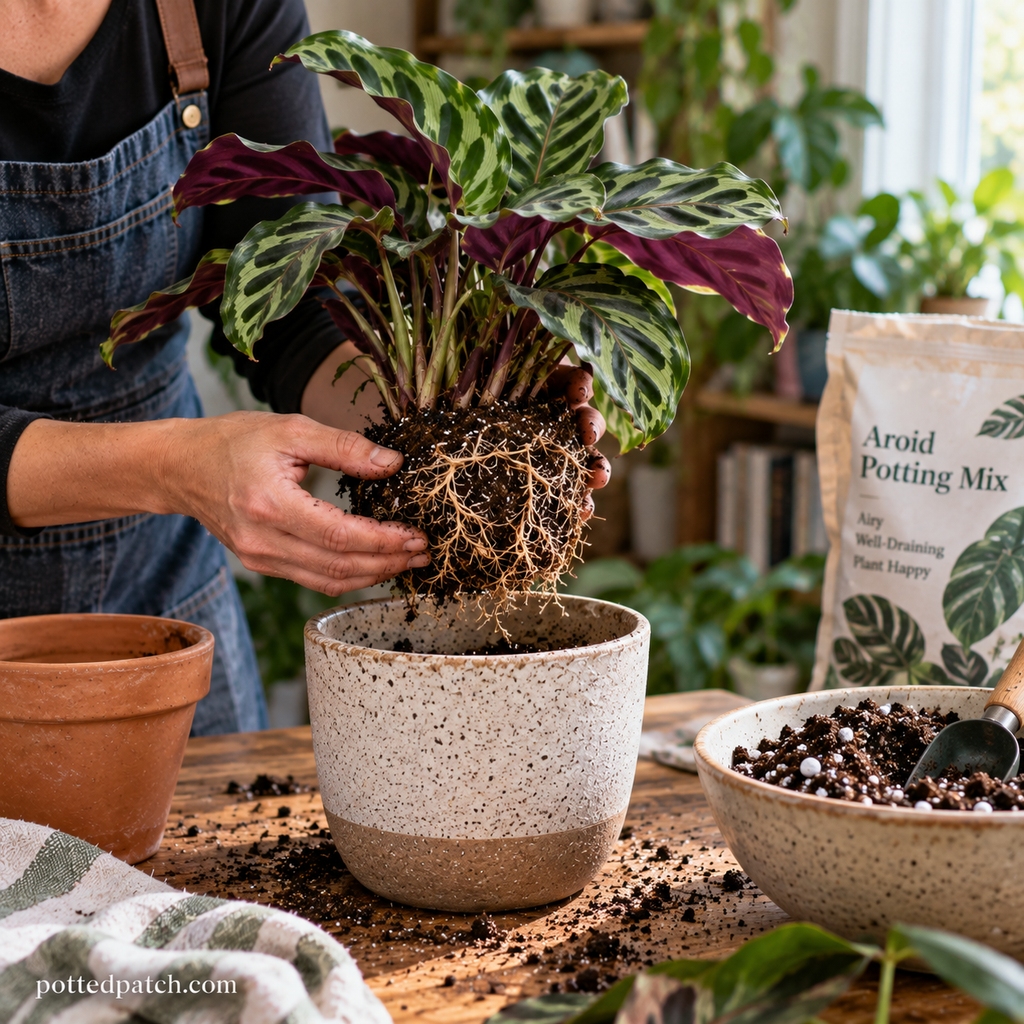
- Choose a pot only slightly larger than the root ball.
- Prepare fresh, loose potting mix.
- Gently remove the plant.
- Examine the roots.
- Remove clearly rotten or dead roots with clean tools when necessary.
- Keep the plant at approximately its previous planting depth.
- Fill around the roots with fresh mix.
- Water thoroughly and let the pot drain.
- Return the plant to stable light and temperature conditions.
The existing repotting image on this page is useful here and should remain in this section.
I’ve found the period immediately after repotting is a particularly bad time to start making several additional changes.
A Calathea may temporarily droop after its roots are disturbed. If I had just repotted one, I wouldn’t immediately respond to that drooping by fertilizing it, moving it to a sunny window, and doubling the watering frequency.
Give the plant time to settle.
Encouraging Healthy New Growth
When I want more growth from a Calathea, I don’t start by adding more fertilizer.
First I check whether the conditions actually support growth.
Look at:
- Light
- Root health
- Soil
- Moisture consistency
- Temperature
- Humidity
- Season
Healthy new leaves are also one of my favorite ways to judge whether a Calathea is improving.
Old damaged leaves don’t repair themselves. A crispy brown edge will remain brown even after you’ve corrected the condition that caused it.
New growth tells you what’s happening now.
If the next several leaves unfurl larger, cleaner, and stronger, that’s much more encouraging than waiting for an old damaged leaf to become perfect.
Fertilizing During Active Growth
Calatheas can benefit from fertilizer during active growth, but more isn’t better.
Use an appropriate houseplant fertilizer according to its directions and reduce feeding when growth slows.
I don’t use fertilizer as a rescue treatment.
If a plant has damaged roots, poor light, badly compacted soil, or a watering problem, adding nutrients doesn’t correct those conditions.
Also watch for buildup in container soil. Crusty deposits around the soil or pot combined with worsening brown tips can be a reason to reconsider how heavily the plant is being fertilized.
Year-Round Calathea Care
One reason fixed care schedules fail is that the plant’s environment changes throughout the year.
Spring
Increasing daylight often brings stronger growth.
This is when I begin watching for:
- Faster soil drying
- New leaves
- Repotting needs
- Increasing fertilizer needs
- Pest activity
If the plant is growing more quickly, it may also begin using water more quickly.
Summer
Longer days and warmer conditions can increase water use.
At the same time, intense afternoon sunlight can become too strong for foliage that was comfortable in the same location earlier in the year.
Air conditioning is another factor that’s easy to miss. A room may be warm overall while the plant sits directly in a cold, dry stream of air.
Fall
As daylight decreases, I start watching how long the pot takes to dry.
I don’t continue a summer watering routine simply because it worked in August.
If growth slows, fertilizer can be reduced as well.
Winter
Winter is where I pay the closest attention to the combination of light, soil moisture, and humidity.
Indoor heating can dry the air while lower light simultaneously slows water use.
That creates a situation where leaves may develop dry edges even though the soil is remaining wet longer.
Adding more water because the foliage looks dry can make the root-zone problem worse.
Instead, I separate the two questions:
Is the soil dry enough to need water?
Is the surrounding air unusually dry?
Treat whichever condition actually exists.
Common Calathea Care Mistakes
Watering on a Fixed Schedule
The plant doesn’t know it’s Sunday.
Check the soil.
Letting the Plant Become Bone Dry Repeatedly
Calatheas aren’t snake plants. Repeated severe drying can produce curling and crispy foliage.
Keeping the Soil Constantly Saturated
Consistent moisture isn’t the same thing as permanent saturation. Roots still need oxygen.
Assuming Every Brown Tip Means Bad Tap Water
Water quality is one possibility, not the only possibility.
Moving the Plant Every Time a Leaf Curls
Frequent environmental changes can make troubleshooting harder.
I prefer changing one meaningful variable and observing what happens, especially in the new growth.
Overwatering During Winter
Lower light often means slower water use even when heated indoor air feels dry.
Putting a Calathea in a Dark Bathroom for Humidity
Humidity cannot replace light.
Relying on Misting
Misting isn’t the same as controlling room humidity.
Using Fertilizer to Fix a Struggling Plant
Fertilizer supports growth. It doesn’t repair rotten roots or compensate for inappropriate light.
Expecting Perfect Leaves
This is a big one.
A tiny brown tip on an otherwise healthy Calathea isn’t necessarily a crisis. I care much more about whether damage is spreading and whether new leaves are emerging healthy.
Troubleshooting Calathea Leaves
Calatheas communicate stress dramatically, but the same symptom can have several causes.
Instead of diagnosing from one leaf, I look at soil moisture + location + roots + recent changes + pattern of damage.
For a broader diagnostic process, see the Complete Guide to Indoor Plant Problems (Diagnosis & Fixes).
Curling Leaves
Curling can be associated with:
- Dry soil
- Low humidity
- Excessive sunlight
- Heat
- Cold
- Root damage
- Pests
- Environmental stress
My first check is the soil.
If it’s dry, moisture becomes an obvious suspect. If it’s wet, I don’t add more water simply because the leaves are curled.
Next I consider temperature, humidity, light, and pests.
Brown Tips and Edges
Small brown tips are common indoors and aren’t necessarily evidence that the whole plant is unhealthy.
If browning becomes widespread or repeatedly appears on new leaves, investigate:
- Humidity
- Watering consistency
- Water quality
- Fertilizer buildup
- Root health
- Excessive drying
I pay particular attention to new leaves. An old damaged leaf can continue looking ugly long after you’ve corrected its environment.
Larger Brown Patches
Larger brown areas deserve closer inspection.
Possible causes include severe drying, sunburn, cold injury, root damage, fertilizer stress, pests, or disease.
The texture can provide another clue.
A dry, crispy patch tells a different story from soft, dark, water-soaked tissue.
Yellow Leaves
One older leaf gradually yellowing at the bottom of an otherwise vigorous plant doesn’t concern me nearly as much as several leaves yellowing quickly.
Widespread yellowing can be associated with:
- Excess moisture
- Poor drainage
- Root problems
- Low light
- Environmental stress
If the soil has remained wet much longer than usual, I investigate that before reaching for fertilizer.
Drooping: Check the Soil Before Watering
This is an especially useful Calathea lesson.
A dry Calathea can droop.
But a Calathea with damaged roots can also droop while its soil is wet.
That’s why I don’t use drooping by itself as a signal to water.
Feel the soil first.
Root Rot
Warning signs can include:
- Rapid yellowing
- Wilting despite wet soil
- Dark or mushy roots
- Unpleasant-smelling soil
- Declining new growth
If damaged roots are found, remove clearly rotten material with clean tools and repot into an appropriately aerated mix when necessary.
More importantly, identify why the roots stayed unhealthy.
Putting the plant into fresh soil but returning it to an oversized pot and the same excessive watering routine doesn’t correct the underlying problem.
Watch the Undersides for Pests
Spider mites are particularly worth watching for on Calatheas.
Look for:
- Fine stippling
- Faded or dusty-looking foliage
- Tiny moving specks
- Fine webbing
- Damage concentrated underneath leaves
Thrips can produce silvery or scarred foliage and may damage new leaves before they fully unfurl.
Mealybugs and scale can also occur.
I make leaf-underside inspection part of routine care rather than waiting for a major infestation. Calathea leaves are large enough that this only takes a moment, and curled new foliage can provide hiding places for small pests.
Persistent fungus gnats are also worth noticing. They don’t automatically prove you’re overwatering, but they give me another reason to check how long an organic potting mix is remaining damp.
Pruning and Cleaning
Calatheas don’t need much structural pruning.
Remove badly damaged, dead, or completely yellow leaves by cutting the leaf stem near its base with clean scissors.
You can trim dry brown tips cosmetically, following the natural shape of the leaf. Just remember that trimming doesn’t solve whatever caused the browning.
If every new leaf develops the same damage, investigate the environment.
I also occasionally wipe dusty leaves gently with a damp cloth while supporting the underside with my other hand. Besides cleaning the foliage, this gives me a good opportunity to look for pests.
Propagating Calathea by Division
Calatheas are normally propagated by division rather than by rooting an individual leaf cutting.
Established plants can develop multiple sections connected through their underground root and rhizome system.
Repotting is often the easiest time to divide one.
Separate naturally distinct sections carefully and make sure each division retains healthy roots and foliage.
I wouldn’t split a healthy plant into the smallest pieces possible just to maximize the number of new pots.
Larger, well-rooted divisions generally have more resources available while they establish.
A Simple Calathea Care Routine
Rather than constantly adjusting the plant, I keep the routine simple.
Regularly:
- Check soil moisture
- Watch new leaves as they unfurl
- Look underneath leaves for pests
- Notice whether the pot is drying at its normal rate
When watering:
- Water the root ball thoroughly
- Let excess water drain
- Empty standing water
- Don’t water again merely because a certain number of days has passed
Seasonally:
- Reevaluate window light
- Adjust watering as drying time changes
- Watch indoor humidity
- Reduce fertilizer when growth slows
- Keep the plant away from heating and cooling vents
The goal isn’t a Calathea with absolutely flawless foliage.
I would rather see a plant with a few old brown tips that’s steadily producing strong new leaves than a cosmetically perfect-looking plant whose roots are sitting in saturated soil.
Final Thoughts
Calathea care gets easier once you stop reacting to individual leaves and start watching patterns.
If I see one brown tip, I observe it. If several new leaves develop increasingly brown edges, that’s a trend worth investigating. If the plant droops, I check the soil before reaching for the watering can. If growth slows in winter, I account for shorter days before assuming it needs fertilizer.
That approach makes Calatheas much less mysterious.
Give them bright filtered light, steady but not saturated moisture, an airy root zone, reasonable humidity, and a stable location. Then use the newest growth as your report card.
A Calathea doesn’t need to look flawless to be healthy. Consistent new growth, healthy roots, and foliage that remains mostly strong and colorful tell you far more than one imperfect leaf.